Saturday, 12 January 2013

Monoprinting & a Printmaking Class


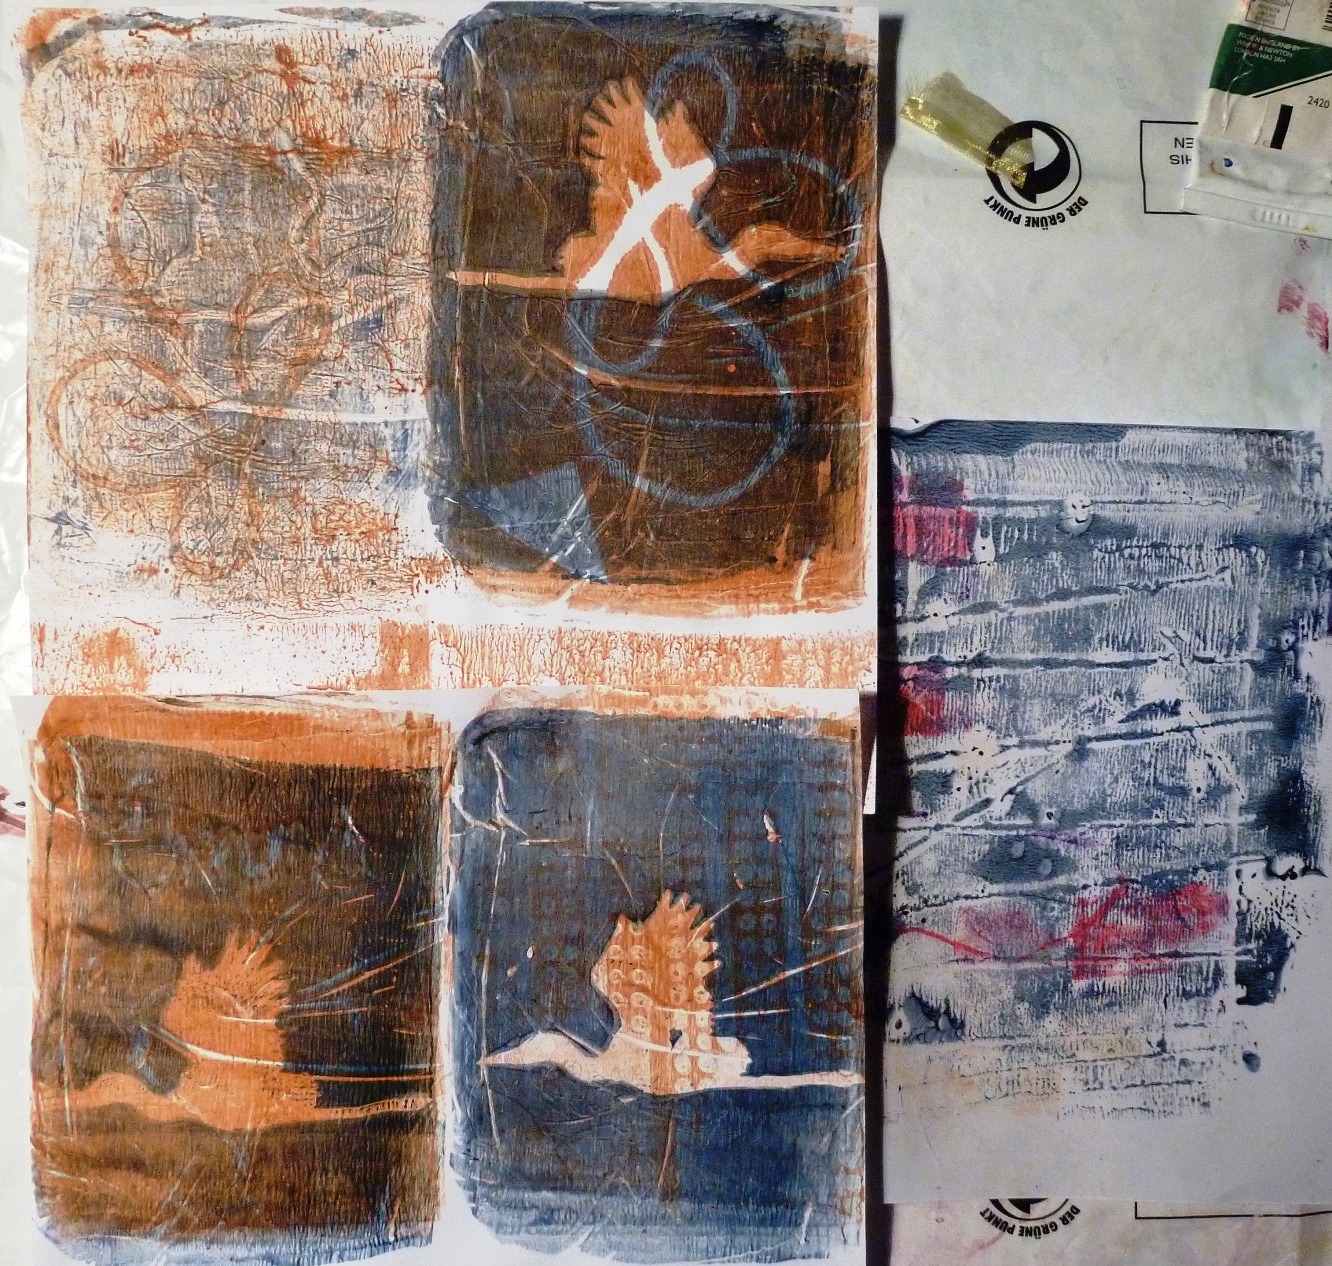
Made some more prints in the week using a variety of papers this time, above - printer paper & in the middle a peacock end feather  resist on a Bible page, the little Bible I rescued from the floor at work when we had a charity bookshelf.

brown paper & gesso with my lovely fennel seed head, book page & gesso with the ghost print of fennel, another ghost print of fennel inside an un-crispy fern resist on cartridge paper & more practising on brown paper. 


 More undefined ferns on book pages - wrong paper, too old plate, mix of ink? I'll have to keep practising :)


 Tools of the trade - Corrine had a link on her page to Carolyn at a Colorful journey who works with 'Gelli' plates & she used something that was described as 'shutters' & I thought I was sure I'd seen some 'packaging' at work that would give a 'shutters' effect. So I had a look - there on the shelf, helping a row of inter dental brushes to stand up neatly in the toothpaste department was a tiny tray, above, top right. Perfect, I thought ;) Typically, I don't seem to have included a sample print.


 These above show the deterioration of the plate, the first is just paint , no shapes, the next a week fern & the last a more distinct end feather & thyme seed head. 


So I stared my Printmaking class again - this is the one I started 2 years ago at West Highland College & the teacher had a bad car accident - it's taken her 18 m to get back to work part time, but this class is being run by another teacher. We got straight into choosing an image for lino printing. I was looking thru a book by Picasso & the image below the fish is what grabbed me but after roughly drawing it I just imagined how many lines I'd have to cut, too many for the first one!


 The top fish is inspired by a watercolor fish I saw in the Picasso book, mines nothing like it, I just thought 'fish'! I drew straight on to tracing paper, didn't even notice then the fish above is 'rubbed' onto the lino by tracing over the tracing paper drawing. I'll define it a little more then cut. I started out thinking I'd leave my drawn lines as the inked part, half way thru I decided I'd cut out the drawn lines so they'd appear white, or whatever color the paper is. Not trying to save my joints, or anything ;) Love taking an open mind to these classes.


from  Three Acrobats, Picasso

I tried to draw a seagull from one of the books - it wasn't moving! if you put your finger over the leg it's a perfect seal - I'm coming on.


This is the sketchbook I made last time, got very excited when we got to the printing stage by taking prints, well just picking up paint, really, when the others were cleaning their plates. Well, why waste the ink? I think teach thought I was mad.


some intriguing Chine Colle, above I thing I got the glue on the wrong side but I like the effect.


Mono printing, the first one is drawing from the back, the 2nd on the plate


 ideas for my lino

The layout i used - teach told me i was getting my money's worth with this one (gulp!) this time I've kept simple...I was just so excited 2 yrs ago, that when we were asked for an image for the following week I ran into the garden & drew anything I could find, desperate. I was so proud to be drawing 'real' things for the first time & amazed at where it all lead me. so I'll take the sketchbook to class once I've added a few pages for this class & add my sketches. There's a section for handouts & instructions, too. I want this class to work for me. such fun to be 'back at college' & getting a little guidance along with other like minded people.

Saturday, 5 January 2013

Monoprinting with a gelatine plate

 I've had a box of Gel sachets in the cupboard for a couple of years now (& they aren't even out of date!)


I've had them as long as I've been enjoying the blog & fantastically informative videos of Linda Germain of Printmaking Without a Press. So exciting to be finally doing this! Using 2 layers of my fave colors, a carved polystyrene block - the diamonds,  right, you can see the marks just from the cling film that was under the gel plate while setting, then comforting grasses a la LG & the good ol sequin waste.

 Then I got my little heron cut out & used that as a resist - the middle one above is where I stamped the wet cut out into a resisted bit..... On the right above is a serendipity bit, oh & below top.


 Got some brights out as the reason I finally decided to do this now was my SIL's birthday coming up soon. She always inspires me to get this years card on the road. Above is using wool/yarn - & some cards to be at the bottom - they all went a little dark. & you could hardly see the little resist of a feather top left that I cut & anyway it kept curling up!


 This is the card sil will get - I drew into the resist shape & colored with pastels the peacock eye & then just as I stuck it down I had palpitations as there was no stitching! So I peeled it back & added 5 stitches....phew ;) Felt better then. Pleased with my first attempt at printing with a gelatin plate.


Then I went for a walk & chose the above color scheme....or it chose me. I'm always amazed at the variety of seaweeds, there are 5 above - the colors of the top one, lime green & blood red is my favorite today - the burgundy on the right is beautiful, too. I had to add the blue shells & pale smokey green lichen; the yellow lichen lives on the rusted wheel. I don't usually appreciate still life but I do this.


 Using the shell, a dotty piece of found rubber mat & a lid at the top & below the seaweed. I love infilling the resisted bit with the ghost bit. I drew some seaweed on card for a resist as I didn't think the real thing would work so well.


Then I fished out a peacock feather & got very excited! Probably needed to go back to jewel colors.


 The plate cut into a pic size & a 'card' size. It's cracked already, very fragile but easy to make & lasts a week in the fridge.


 This is a bit of plastic used a a pallette - I can see it being cut up in the future.

Sunday, 30 December 2012

Happy New Year!

Here's to a Happy & Creative New Year!

 A unique tree from my window - scrubby willow & it's lost it's leader but I just love the shape. Surprised it hasn't blown over in this wind. I've been waiting for a high tide & the stripes are a bonus. A friend will be borrowing the boat soon to 'take the lines' of it for a school project so I may take the pic again, get more water at the bottom. He's the one who refurbished the boat for the owner before us & as it'll be a labor of love, while teaching kids, he's the one to do it. I'll use this image for a transfer.


 In my stocking I found a daylight bulb. I've been bemoaning our useless task lighting while watching tv in front of the fire to do a little bit of stitching with - you never quite get the lights right when you build a house. So the next best thing is a lamp on the table full of books behind the couch reaching over just where I need it. To find space for that we moved some books around & came across this, above.


  Tunnicliffe sketched for paintings but also just for the love of it leaving 50 sketchbooks from 1935 for 40 yrs. I'm so excited because I really haven't got very far at all with learning to draw birds. I mean, I've been watching them closely for a year now & they just won't keep still! All I've managed is a scribble or 2 & being taught where the bend is in a pair of bird's legs, by my arty buddy.


 I will still take a class of some sort, but if I practise by copying these lovely simple lines, by that I mean I can actually see where the line is meant to be & possibly how to do it, it's a start.


I know observation is the way to go but I need to get a feel for it & this way I can actually see the little bu I mean blighters!

 I'm not a representationalist but I remember from my year of art classes in 1978..... that before you go off on a tangent first learn a perfect ellipse. Do it 'properly' before you rearrange it ;) See, '78 was a long time ago, this is why I'm struggling!


I've never had the honor of seeing an owl close enough to focus let alone to sketch! & now I can try. 

So, birds have been on my mind, as has the 'theme' for my next body of work. It's been there under my nose for years, in my dreams before that, it's all around me when I step out from inside four walls, it's around the bay. Simple really. I don't have any big words for 'Around the Bay', I don't feel I need any tho I'm sure I could find some. My textile buddy thinks 'Around the Bay' is a cop out;  I told her of course, but it's a life time of work!


So, mid December I'm walking the dog on the shore just as the light is going. I can hear the heron has been disturbed & look to see where he's gone & he flies under the new moon in front of the sunset over the birch trees   ( I sound a little like the Bernstein Bears - under over thru!)

  I sketched the piece of white paper, 2 above left, before drying the dog even, desperate to not  forget this simple arrangement. Quick washes of color - I've written the colors down, too - Indanthrene Blue is my favorite blue,  it's reminiscent of Indigo or Denim, wonderful. How to find a silhouette of a heron, it wasn't exactly right in that lovely book I found - of course, good old google. The DH was impressed with my cut out drawing. I'll be making a strong one to use as a resist.


& blow me if he didn't fly back again! 

It was a worry before we moved up here (just parental concern ;) that I would do no more than 'commune with Nature' I had no idea then what a joy that would be, that I would become someone who could & probably consider that & all that goes with it my greatest achievement. So. the start of my sketchbook, so exciting, I only hope I do it justice. Happy New Year!

Friday, 21 December 2012

Happy Christmas to you & Yours


Wishing you All a Very Merry Christmas


With Love from Me & Mine

xxx

Saturday, 15 December 2012

A little more felting

Well, I had another go at felting at home, choosing to make a little book cover as a starter. I used the Lizzie Houghton Creative Felting book that I've now read from cover to cover!

The 'bookcover' closed

  This was inspired but the coral page in the book, mine wasn't as voluptuous as I'd hoped it would be but Lizzie's been doing this for years! This is using the 'mosaic' technique

the 'cover' open

 where you make the first stage of felting, 'pre-felt' in 2 colors, snip thru it all including the pieces of silk you've added to the mix making lots of strips, turn it all head over heels laying it back down again neetly & carry on felting, adding some net & more whisps of wool to each side to help keep it together.


I'll keep practicing;) From bright, above to cool & soft in woods by the shore 10 minutes drive away


sunset colors


cool mint

 even ice circles!


 soft again, what is it about the silhouette of a tree that pulls at our strings?


I'm remote but not THIS remote


Been thinking this week, well, last week too, now that I've got a little time. In between filling my Etsy shop I've been hauling stuff from my studio up to the Youngest's room where it's warm & not damp. He's having a fabulous time by the way, me, I'm getting a little more used to the empty nest) The idea is to take a little box at a time & sort it, label it then in the Spring put it back again, well, a lot less of it, hopefully. The phrase 'everything in it's place, a place for everything' gets on my nerves, but only because i know it's right, so I'll try.

 While doing the practical, I've been mulling over what to do for my 'body of work' for next year. More like racking my brain. I know what I like, but is it a 'theme' will it be 'cohesive'? I had a virtual chat with Iz at Threadnoodle  who's going thru the same thing, so exciting! & she gave a link to Sandra Meech book 'Connect Design to Stitch', you can 'look inside' (I love that facility!) & as Iz says, it's a little difficult to get a theme started, so much to think about. But I said in our chat that it seems to boil down to a quick drawing , a thumbnail sketch, lots of them!  as everyone I respect like Linda Kemshall & Laura,  Jan Beany & Jean Litttlejohn, Gwen Headly, Cas Holmes, Val Holmes, Frances Pickering, Maggie Grey,  oh so many, start off with one; they must be right!

Saturday, 8 December 2012

Felt workshop...just for me!


 I felt in need (ha ha!) of a workshop to make something JUST FOR ME!!!!!! When I saw on Facebook (it does have it's uses, after all!) that Meg , my Yoga teacher, was giving a felt making workshop I booked it. A treat after all my hard work ;) She's a very creative person & used to make felt hats & scarves & hangings before teaching took over her life.

Above are the samples having been whetted out & rolled a little.


A snowy view of Bla Bheinn (Blaven) from Meg's sitting room

 After a delicious lunch we knocked up a simple scarf shape, which I will probably cut (gasp!) into a couple of books to keep the samples in. I haven't done much wet felting so wanted to do little tests - on the left is a little 'pocket' using a resist - I'll make it into a purse. To the right is a piece of muslin with pink on the reverse, the idea is the fabric is 'ruched' when the wool shrinks. I'd taken some thread to stitch on small pieces of fabric at prefelt stage but I was probably talking (& listening!) too much. tho the right is a 'blend' of purple & turquoise with a silky top & thread embedded, above that is pale wool with dark fabric - only natural fabric will felt together with wool. To it's right is a deep pink & black with a 'moon' of black velvety fabric which is held on with whisps of wool, trapping it. I'll stitch for definition later.

 The bottom middle piece is your classic 'sea' colors with threads on the surface - I do like this! then a thick wool 'spiral' embedded & beyond that the 'real' colors of the shore outside my house - yellow ochre, terracotta & blood red with a dash of dark & lime green added, not the usual idea of sea colors, I know, but true. At the bottom right burgundy &  green wool trapping burgundy organza. Some lovely experiments.


 Above & below are subtle (for me)  but interesting bits of the scarf/book cover/hanging backing, whatever it turns out to be with bits of gold organza & gold threads 'trapped'.


A wonderful day of experiments & I will now have the confidence to throw more at it next time - it's amazing how bits of color disappear once embedded - & it'll be a lovely bit of fabric to stitch into of an evening once I've invested in a daylight lamp - the glow from the telly just doesn't cut it! I discovered I had 'Creative Felting' by Lizzie Houghton ( I had tried to get Meg to help me make one of Lizzie's coat's but she wasn't having it ;)  feeling a little guilty as I knew I had the book but hadn't realised it was by the same beautifully creative person I saw at Knitting & Stitching. So I look forward to pouring thru that using the renewed inspiration Meg gave me.


A very quick back of an envelope sketch - literally, it's all I had in the car of one of the views down the Elgol peninsua to where Meg lives in Torrin, half way down. I see views all the time, I'm so lucky but once back in the studio I need a visual reminder of what went where & what the actual colors were. I used to think a sketch had to be a worthy piece of work; now I'm getting better at just scribbling....for me.

Saturday, 1 December 2012

Fairs over & a Mini Tutorial

Made a few things in the week to top up my table


Had a looksee for any half made cards in the studio but the moon ones always go so these are new


Was going to sit at the fair & stitch a few dangling beads on these quirky tree decorations but it was so busy it didn't happen, busy all over but I didn't reach my target so I won't do a school fair again.  I don't expect a fabulous fair each time (well, deep down I do!) This one is 40 mins drive each way of petrol, & I was in between the Lifeboats - how would I not support them with a child in the merchant navy? - & a school kids project to fundraise to go help kids in Peru - the Eldest had been on a World Challenge trip to Peru, a worthy cause of course. But it makes my table look so expensive! You live & learn.


Given that I found the switch to turn off the flash on our little camera, chuffed me!, I kind of forgot to turn it back on when there was hardly any light about. Oops, if I had you could see some color in the cuffs & all the moons would look like the 2 at the top - that was the New moon I saw on the way to the studio 2 weeks ago.

I thought to celebrate 3 years blogging - sometime in November but I deleted some early posts to try to make more storage - I'd give a mini tutorial.

Star Cards.


 I had some bits & pieces on my desk - I tipped the white/lace bag over to face the tipped jar with some delicious color in it for the close up pic.  I'm looking forward to clearing all this away now, but it does invite you in there to explore some exciting possibilities, doesn't it?


 So, if you can find some space, lay out 2 strips of cream cotton, about 1 inch wide, 8 or so inches long. I thought I could fit 6 little piles of snippets on each strip. I used my ironing square so I could carry it back & forth from the iron to the messy desk. Fuse thin strips of Bondaweb onto each piece & remove release paper. Go over to the desk & lay out your snippets. I made the top row pinks & purples & found enough blue velvet, cutting as I went,  to add to 3 or 4 piles, the pink silk went further & I'd go back & forth adding a bit here & there to the piles. It's not an exact science, use what you have.


You don't have to make so many, but if you need them this is a time efficient way. I added some threads before placing a small piece of lace cut from a long recycled strip so it didn't seem so bad to snip bits off. Take it all over to the iron & give it a minute or 2 on medium heat. Of course the lace at the top is no where near the bondaweb so after fusing you could pin each pile for sewing, or invest in one of those tables that has the machine sunk into it so nothing falls off over the edge - on my Christmas list.......2020! Using the lace at the top is so you can see color peeping thru the little holes & the stitched star shape is better defined.

Using gold metallic or light thread I stitched 2 tram lines up one side, leaving a loop & turning round to go back again. I had an idea to 'pull' the thread between each individual piece so I'd have more dangling thread but it got complicated when cutting & didn't help my tension....Iz, where are you! The pic I took of that was a blurry mess so use your imagination!


Having trapped all your little bits with stitches you can now cut the strip into the 6 pieces. Fray the edges of the base fabric a little, choosing the orientation of each tiny card to be - I turn it round & round & just choose the 'side' I like best.  This is where the production line stops & you give each little card your undivided attention ;) Make a pile of them & then find some darker base fabric, for a little contrast & to make another stablising layer. Cut a strip a little wider than the top piece , fray the edge & place each piece onto it cutting it to size & making another pile by the sewing machine.

I know we can all draw a star but above is how I do it! I find it helps to have a little drawing by the machine. Thread your machine with black or dark thread. I start at the bottom right & continue following the arrows. (is this how everyone draws their stars?!) So the first line is reverse stitch, the next forward stitch etc; with the first reverse stitch look at your drawing & aim for where you think the top should be & the rest sort of follows. (If it doesn't follow then draw it out on the back, stitch, turn over  & then your second pass can follow the shape made by the bobbin thread.) Then I go over the whole star again - if you're good at free motion stitching go right ahead!


I leave my threads hanging, you may have noticed! For a rustic look I used some brown paper for the last layer - this happens to be the paper that comes between layers of apples at work, lovely texture - cut roughly to size keeping everything together in yet another pile, ready to glue. Use the glue stick on the paper, it doesn't like fabric & press each piece firmly, then go thru the pie again glueing the back of the piece before placing on the card.

 Voila, a lovely pile of cards - they did well, I'm glad to say. Choose your favorite & scan it if you want to make an 'e card' as well for long distance friends & family. There's nothing like a handmade card.


The card bottom right went a little 'wrong' in the position of the star but instead of binning it I went over it with gold visually ooching it towards the 'right' direction. I try not to use those word very often in my studio!

Hope you've enjoyed this little tut. I'll leave you with a pic of moonrise from my bedroom window


& moonset on the way out this morning.